
Some websites use one domain for multiple countries or business units. Each may need its own privacy settings, vendors, consent categories, languages, or consent popups.
For example, your company might use:
example.com/aufor Australiaexample.com/ukfor the United Kingdomexample.com/usfor the United States
You can use different Cookie Information consent solutions on subdirectories of the same domain by adding the cs-id attribute to the main installation code. This attribute tells Cookie Information which consent solution to load on each page.
In this article, we’ll show you how to set it up and check that it works correctly.
Before you start
Here are a few things to know before you start:
- Cookie Information consent solutions are usually linked to a domain or subdomain. To use different solutions on subdirectories of the same domain, you need to specify which solution should load on each subdirectory.
- You’ll need a separate consent solution for each subdirectory that requires different privacy settings.
- You can add domains to Cookie Information, but not individual subdirectory URLs such as
example.com/uk. The installation code determines which consent solution loads on the pages in each subdirectory. - Every page in a subdirectory must load the main installation code with the correct consent solution ID. This includes pages nested further within that subdirectory.
- If your website uses a shared script or template across multiple subdirectories, you’ll need to configure it to load the correct consent solution for each URL path. You may need your developer’s help.
Note: The cs-id attribute determines which consent solution loads on a page. It doesn’t automatically assign a solution to all pages in a subdirectory. Your website must load the correct installation code on those pages.
Set up different consent solutions for subdirectories
To set up different consent solutions for subdirectories, follow these steps:
1. Log in to Cookie Information.
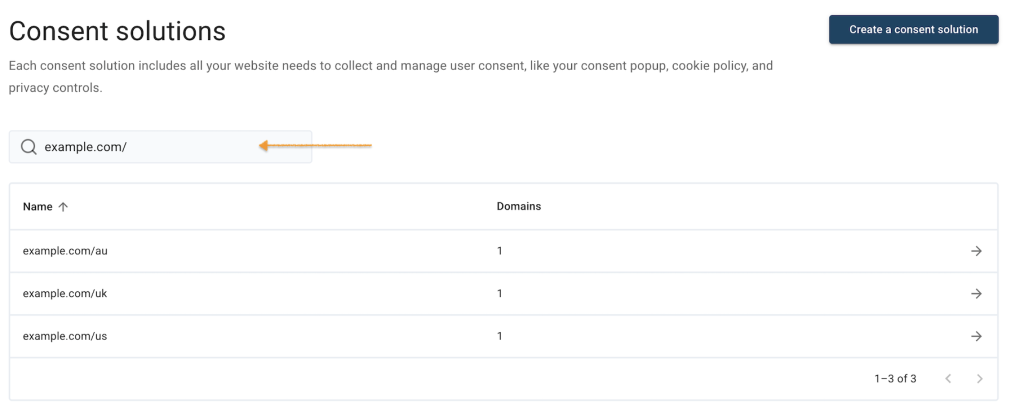
2. Go to Consent solutions.
3. Find the consent solution you want to use for a specific subdirectory.
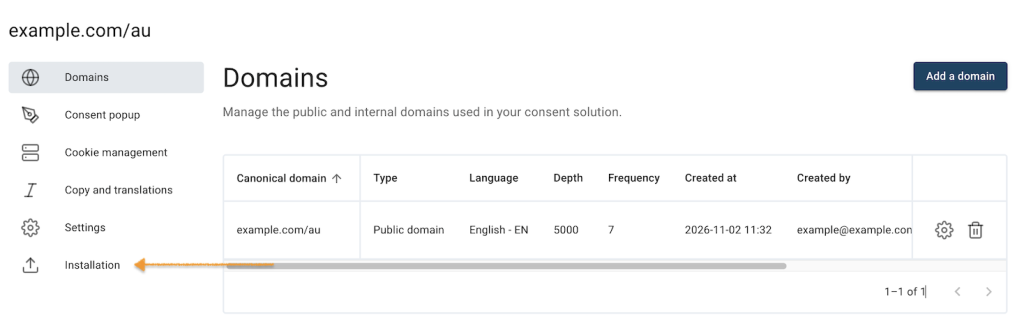
4. Go to Installation.
5. Copy the main installation code.
The standard installation code looks like this:
<script
  id="CookieConsent"
  src="https://policy.app.cookieinformation.com/uc.js"
  data-culture="EN"
  data-gcm-version="2.0"
  type="text/javascript">
</script>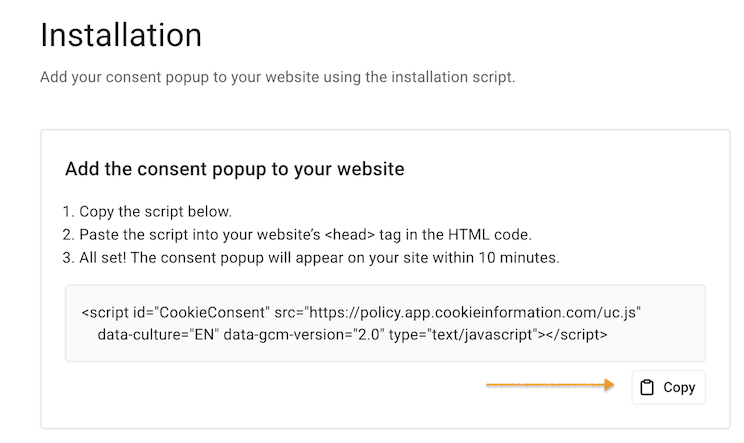
6. Find the consent solution ID in your browser’s address bar.
Note: The consent solution ID is the number between /consent-solutions/ and /installation in the URL.
For example:
https://go.cookieinformation.com/consent-solutions/67436/installation
In this example, the consent solution ID is 67436.
7. Copy the consent solution ID.
Note: The code shown in Installation doesn’t include the cs-id attribute. You’ll need to add it manually.
8. Add the cs-id attribute to the opening <script> tag.
9. Set its value to the consent solution ID you copied.
For example, if the consent solution ID is 67436, the updated code will look like this:
<script
  id="CookieConsent"
  src="https://policy.app.cookieinformation.com/uc.js"
  data-culture="EN"
  data-gcm-version="2.0"
  type="text/javascript"
  cs-id="67436">
</script>
Note:
- Replace
67436with your own consent solution ID. - Keep the other attributes and their values from your original installation code.
- Make sure the
data-culturevalue matches a language configured for the consent solution. In the example,ENmeans English.
10. Add the updated installation code to the <head> section of every page in the subdirectory where you want to use this consent solution. Place it as high as possible in the <head> section, before scripts that require consent. If these pages already load Cookie Information’s main installation code, replace the existing code instead of adding a second copy.
For example, for example.com/uk, the same updated code must load on example.com/uk, example.com/uk/products, and example.com/uk/contact.
Note: Don’t add async or defer to the main installation script. These attributes can delay its execution and interfere with blocking cookies before consent is given.
11. Repeat these steps for each subdirectory that needs a different consent solution. Make sure each one loads the installation code with its assigned cs-id value.
12. Done. Each subdirectory is configured to load its assigned consent solution. Follow the steps in Check your setup to verify the installation.
Use different consent solutions for different countries
Let’s say your company uses example.com for three countries. Each country has its own consent solution in Cookie Information.
To set up a different consent solution for each subdirectory, follow these steps:
1. Find the consent solution ID for each country in Cookie Information.
For example, your setup could look like this:
| Subdirectory | Country | Consent solution ID |
example.com/au | Australia | 11111 |
example.com/uk | United Kingdom | 22222 |
example.com/us | United States | 33333 |
2. Copy the installation code from Installation for each consent solution.
3. Add the cs-id attribute to each installation code, using the corresponding consent solution ID.
For example, the installation code for Australia would look like this:
<script
  id="CookieConsent"
  src="https://policy.app.cookieinformation.com/uc.js"
  data-culture="EN"
  data-gcm-version="2.0"
  type="text/javascript"
  cs-id="11111">
</script>
4. Repeat the process for the other countries, using their corresponding IDs:
- United Kingdom:
cs-id="22222" - United States:
cs-id="33333"
5. Add the appropriate installation code to the <head> section of every page in each country’s subdirectory. Replace any existing main installation code on those pages.
6. Check that each subdirectory loads the correct consent popup with its assigned vendors, categories, languages, and settings.
Note: The consent solution IDs above are examples. Use the actual IDs from your Cookie Information account and keep the other attribute values from your original installation code. For example, use the appropriate data-culture value for each country’s consent solution.
Check your setup
After updating the installation code, check that each subdirectory loads the correct consent solution, including on pages nested within it.
To test your setup, follow these steps:
1. Open each subdirectory in a private browser window.
2. Check that the correct consent popup appears.
3. Make sure the popup displays the expected language, vendors, consent categories, and settings.
4. Accept or reject consent and check that cookies, tags, and other data collection technologies behave according to your consent settings.
5. Change your consent preferences and check that the updated choices are applied correctly.
6. Navigate between subdirectories and check that the intended consent solution and consent behavior apply to each one.
7. Repeat the test on relevant pages, including nested pages such as example.com/uk/products.
Note: Test in a private browser window so previously saved consent choices don’t affect the results. If a popup doesn’t appear, clear saved consent and try again before assuming there’s an installation problem.
Troubleshooting
The wrong consent popup appears on a subdirectory
Check that the cs-id value in the installation code matches the consent solution ID shown in the URL of the Installation section. Check the affected page itself, not just the subdirectory’s main page.
The same consent popup appears across all subdirectories
Check whether:
- The installation code is missing the
cs-idattribute. - All subdirectories use the same
cs-idvalue. - Your website uses a shared script or template that loads the same consent solution on every page.
- The original installation code still loads alongside the updated one.
Make sure each page loads only the intended Cookie Information installation script with the correct consent solution ID.
The consent popup doesn’t load
Make sure you’ve added the installation code correctly to the <head> section of the affected page. In the example shown in this article, the script includes:
id="CookieConsent"src="https://policy.app.cookieinformation.com/uc.js"data-culture="EN"data-gcm-version="2.0"type="text/javascript"cs-id="YOUR_CONSENT_SOLUTION_ID"
Replace YOUR_CONSENT_SOLUTION_ID with the ID assigned to that subdirectory. Make sure the opening and closing <script> tags are present. Check that the domain is configured in Cookie Information and that the script doesn’t use async or defer.
Note: These attribute values are examples. Keep the values from your original installation code, including the correct data-culture value for your popup.
The consent settings don’t match the expected region
To check your consent solution settings, follow these steps:
1. Go to Consent solutions.
2. Open the consent solution assigned to the affected subdirectory.
3. Check that its ID matches the cs-id value in your installation code.
4. Check the vendors, consent categories, languages, and consent popup settings.
Update the installation code or consent solution settings if needed.
Changes aren’t visible immediately
Your browser or website may still be showing an older, cached version of the page or script.
Try these steps:
1. Clear your browser cache.
2. Open the affected subdirectory in a private browser window.
3. If your website uses a content delivery network (CDN) or another caching service, ask your developer to check that the updated installation code is loading on the affected pages.
Then test the subdirectory again.


